Getting started
⏸️ Page on Hold – Details Waiting for Updates
Some info might be stuck in line and needs a little refresh! 🔄
Our team is reviewing everything, so please hold tight while we bring it up to speed!
If you need immediate assistance or spot outdated info email support@q-better.com.
Introduction
Welcome to Qube, a powerful platform designed to revolutionize the way you organize your service. In the following pages, we'll guide you through Qube’s key features and functionalities.
Contents
Login and logout
Functional areas and pages
Buttons
Filtering
1. Overview
1.1. Locations
1.2. Main features
1.3. Architecture
1.4. Backoffice structure
1.5. Wizard
Login and logout
Open the mailbox of the registered email address and look for an e-mail from qube@q-better.com. For first time users, an email with the steps on how to create an account is sent to the account’s administrator.
Once created, the first step to start using the system is to log in to the BackOffice:
- In your browser, open Qube's login page. Type your credentials.
- Click on the ‘Login’ button or press the ‘Enter’ key on your keyboard.
- To log out, click on your name - located at the top right corner of the BackOffice - and select the ‘Log out’ option. If you are using QM-PAD, click on the ‘Log out’ button at the bottom left corner.
Functional areas and pages
Assets, Devices, History, Integrations, Settings and Tickets (QM-Pad). Four of these areas (Management, Assets, Devices, History and Integrations) have one second-level page.
The background colour of the left side bar identifies the functional area the page belongs to (the selected area will have a dark grey background, whilst all other unselected areas will have a light grey background).
At the top of every page, the fixed navigation bar grants the system’s general actions: “Refresh devices”, “Location” and “Profile” buttons.
On almost every page and/or area, there are two main action buttons. The first, with a blue background, contains some major actions like “Save”, “Create”, “Refresh”). The second, with a red background, serves to “Delete” actions.
Buttons
On any record in a list, there may be one or more individual buttons – Disable/Enable button, Edit button, More Actions button, Duplicate button, Delete button, Create button, Upload button and Save button. Clicking on one of those individual buttons will trigger an action that will be executed over the selected resource. The following table describes the individual actions.
Table 1. Individual actions
| CLICKING ON | WILL |
|---|---|
| a DISABLE/ENABLE button | Changes the status of the selected resource (active/inactive) |
| an EDIT button | Always opens an edit subpage where you can edit the details of the selected resource. |
| a MORE ACTIONS button | Always opens a context menu with more action buttons that can be associated with the selected resource. |
| a DUPLICATE button | Duplicates the selected resource and its configurations. |
| a DELETE button | Deletes the selected resource. |
| a CREATE button | Either opens an edit subpage or creates and expands a new line record in the list (enables the Save button). |
| an UPLOAD button | Opens a context menu for external file uploading on the selected resource. |
| a SAVE button | Saves the setting and configurations applied to the selected resource. |
Saving changes
Whenever you make any change to the resource details, a “Save” blue button will be available at the bottom right corner of the desired action to confirm the changes you entered.
You will always be informed of your actions. When saving changes, there are 2 possible outcomes: (1) a green verified icon, confirming your good execution,
Filtering
Search tool
On almost every area or page, you can filter any element by typing it on the search bar at the top left corner.
This free search filter is a powerful tool that finds all the records matching the string you insert in the box with any of the selected resource. This free search is case insensitive. If you want to clear the free filtering, just erase all characters from the search box.
1. Overview
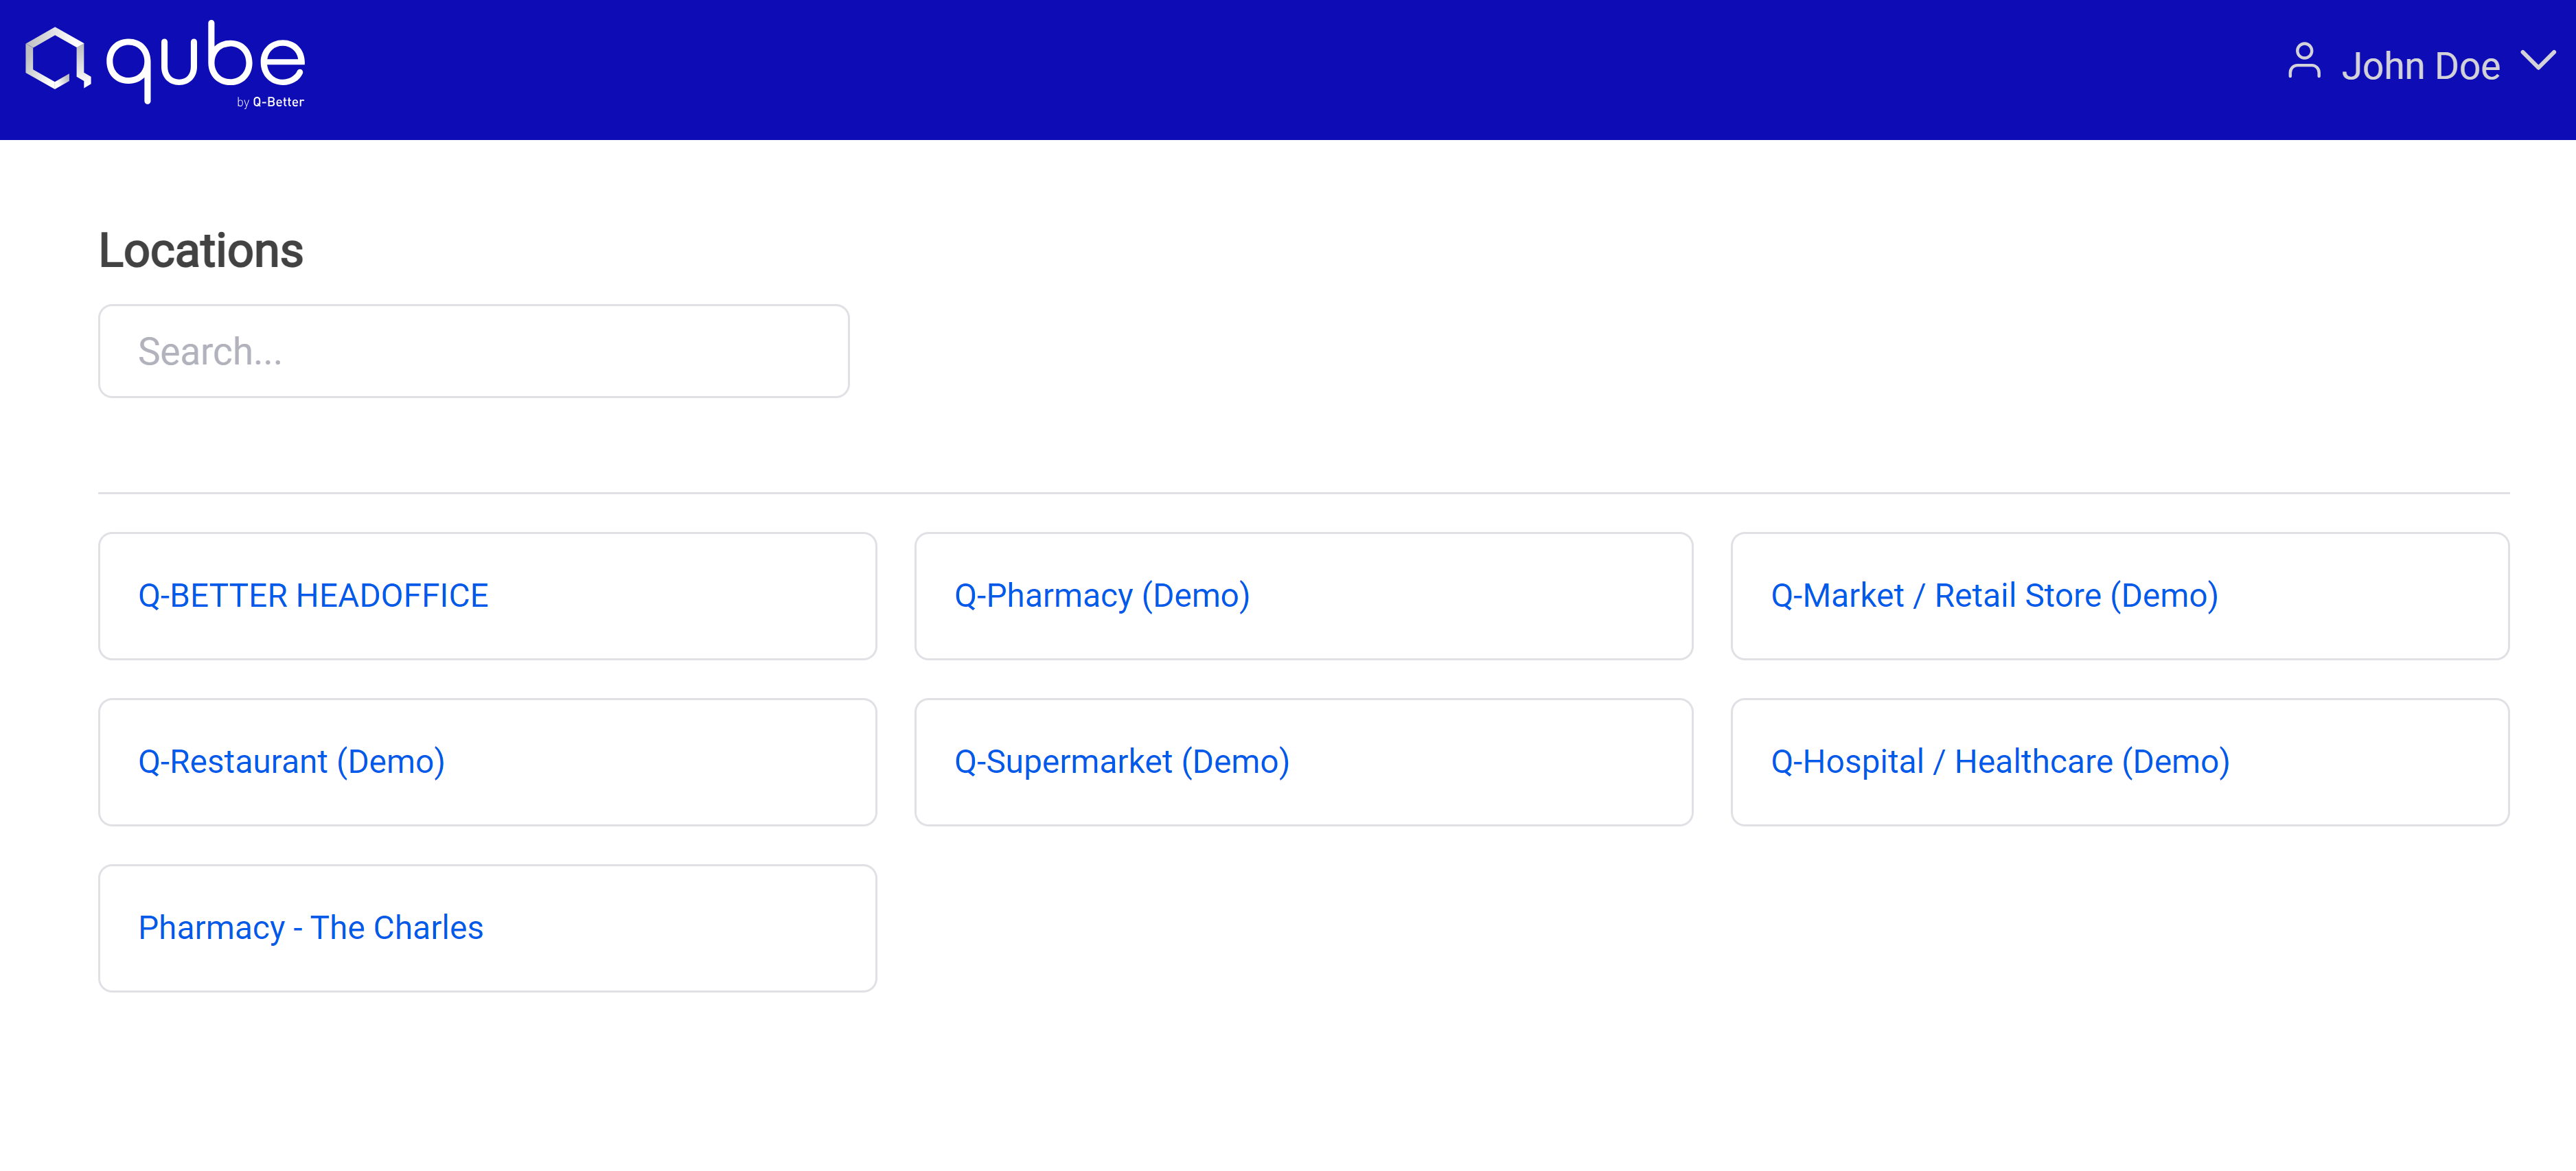
1.1. Locations
Your Qube Dashboard offers a convenient overview of your multiple locations, all linked to a single email. It's important to note that while you can access and manage each location efficiently, there is no centralization of configurations between them. Each location remains independent: simply choose the specific location you wish to manage and enjoy the flexibility of overseeing your various accounts without the need for central control.
1.2. Main features
Qube includes several modules, features, and devices that, together, build a complete visitor flow management system:
- Management – this module is the core function of Qube. It allows the configuration of the visitor flow according to the service procedures, keeping queues organised and visitors informed.
- E-ticket – this contactless feature allows the organisation to display a QR code and provide a paperless alternative for visitors to get their ticket.
- Devices – there are different types of devices to complement the system, guiding the visitors through the service flow. History – all data is displayed in charts and tables to allow the organisation to make data-driven decisions and have a global or local overview of their service performance.
- BUK Appointments – this module is an external integration, that allows the organisation to organise and plan their services and resources, by providing the visitors the possibility to previously book their visit. It is fully integrated with the queueing module.
ℹ️ Access to these features will depend on the modules acquired.
1.3. Architecture
Qube is hosted on Q-Better’s servers. Being a public cloud architecture, it requires a continuous and stable connection between all local devices and remote servers.
System’s Network
As a public cloud solution, this system and all its components require internet connection.
For the functioning of the system, ports 443, 8883, and 8084 must be open. This is imperative as, without port 8084 and 8883, real-time queue status updates do not work.
All devices connect via TCP/IP and MQTT to cloud servers. All traffic is encrypted (SSL).
Local Network
The installation of each location is based on connecting all devices and applications to the remote servers and configuring all needed resources on its BackOffice.
All devices connect via TCP/IP to the router that is connected to the Internet.
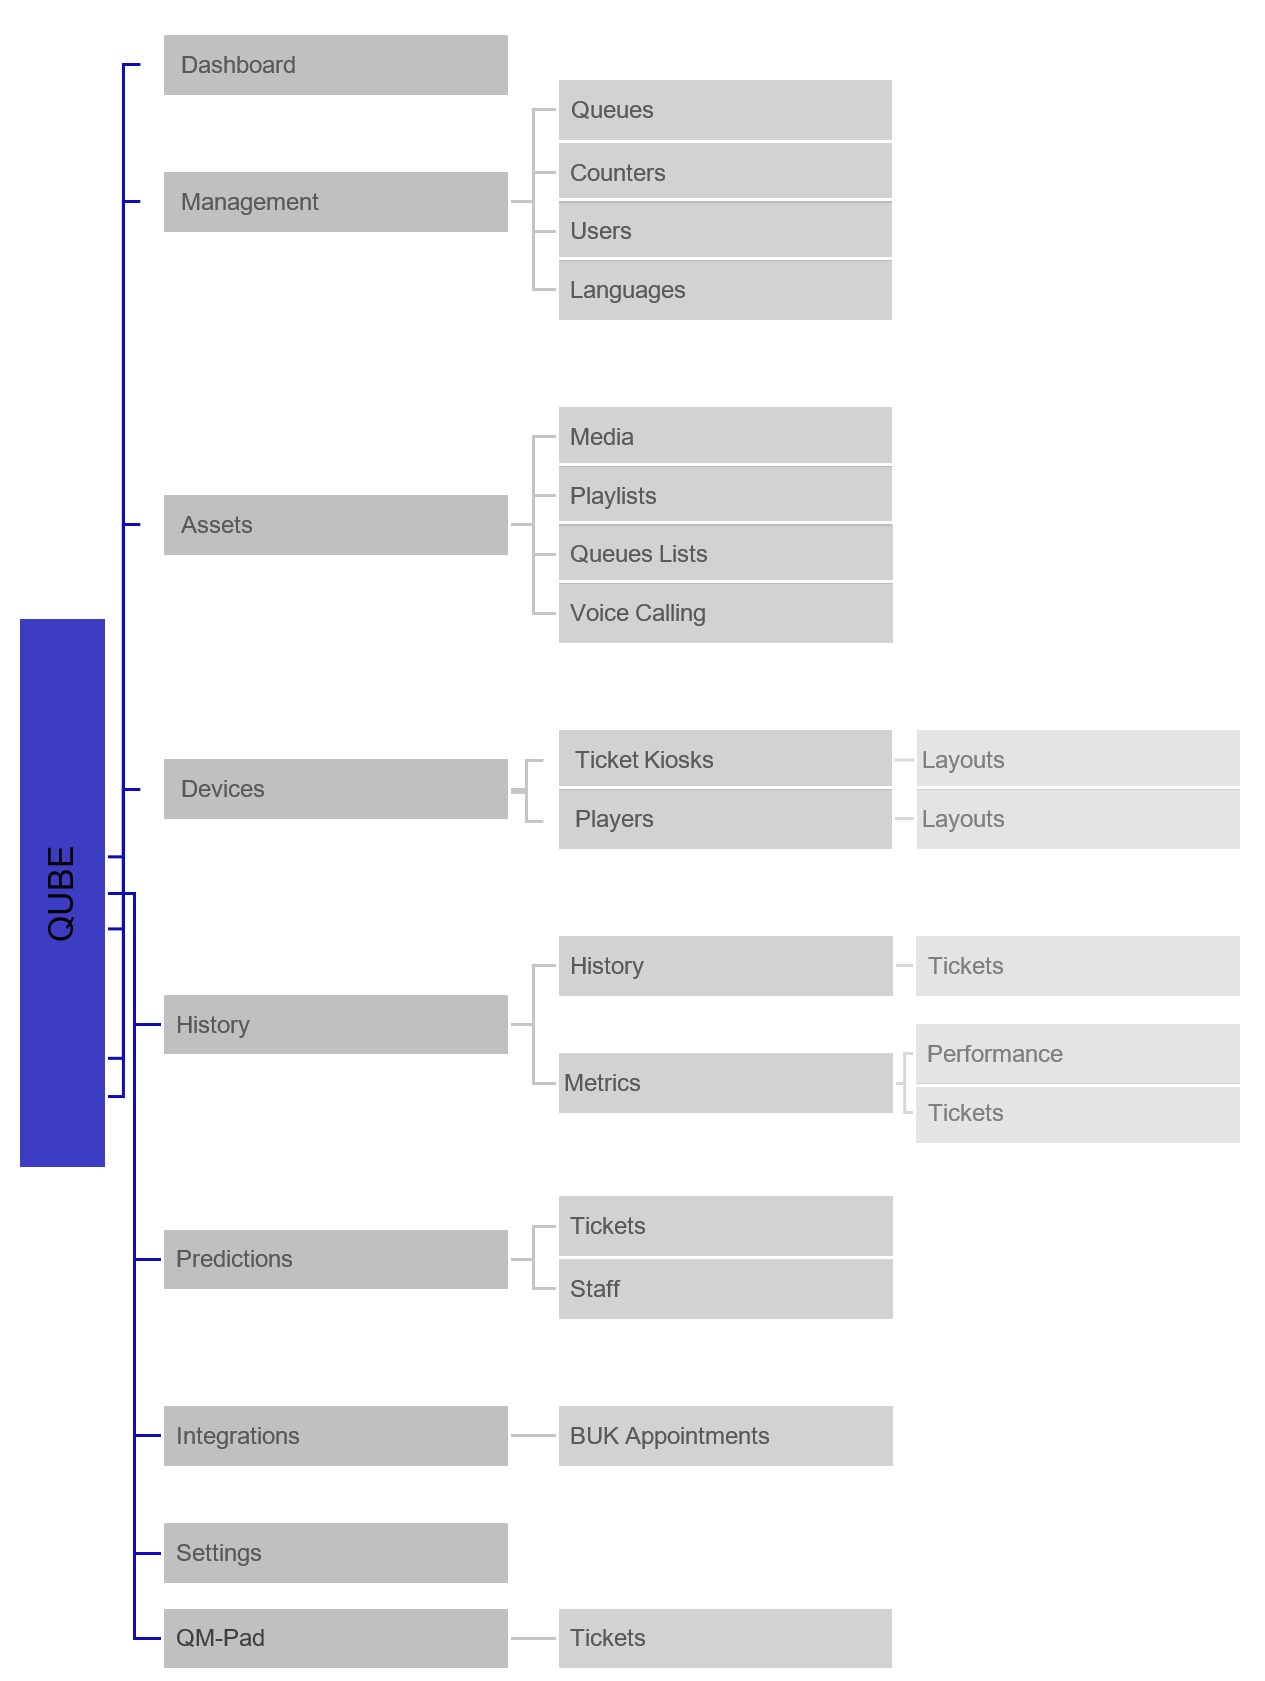
1.4. Backoffice structure
Qube’s backoffice is structured in the following way:
1.5. Wizard
When accessing a location for the first time, or if there is no content on the management area of Qube, you will be introduced to the Wizard. The Wizard is Qube’s Welcoming platform, designed to guide you through the account setup process. The wizard presents four predefined businesses (Supermarket, Pharmacy, Restaurant and Clinic) that align with common user preferences and needs, offering a quick and efficient setup for your Qube account. These predefined accounts cover the creation of Queues and Counters. For those who prefer a more customized approach, the advanced option empowers users to set up their own names for Queues and Counters. If you don’t want to go through the wizard, you can simply click on “Dismiss”, confirm your action, and manually set up all configurations. Choosing a predefined business When choosing this option, you can still edit the chooses names for any queue and counter. If you want to delete some of the predefined queues and counters, simply click on the “bin” icon, located at the right of the edition bar. If you want to add queues or services, simply start typing the respective queue or service and another option will automatically appear. To move forward to the next menu, simply click on the blue button “Next”; to move back, click on the white button “Previous”; to dismiss the wizard area, click on the red button “Dismiss”.
⚠️If you confirm the “Dismiss” action, you will not be able to undo it.
On the last area “Summary” you will be able to see your account’s overview. You will also have prepared one main Queue List, one main Player Layout and one main Ticket Kiosk Layout.
All elements listed so far can still be edited once your account is set up.
To finish the setup of any predefined account, simply click on the blue “Finish” button, at the right below part of the page, and on the blue “Next” button.
Testing your new account Once you have created a predefined account, you can start testing it:
- You can scan the QR-code generated for your location and test your E-Ticket (first step)
- On your smartphone, generate a ticket for any selected service (second step)
- Call your ticket by clicking on the QM-Pad (third step) You can also jump to your account, by clicking on the blue “Go to Dashboard” button.