Management
⏸️ Page on Hold – Details Waiting for Updates
*Details missing: Queues Lists, Voice Calling, Schedules & E-Ticket Layouts*
Some info might be stuck in line and needs a little refresh! 🔄
Our team is reviewing everything, so please hold tight while we bring it up to speed!
If you need immediate assistance or spot outdated info email support@q-better.com.
Introduction
The management area contains the subpages used to configure the queuing system.
Your location’s queueing can be configured by clicking on the + Create or + Invite button of the desired subpage. For most subpages, that same configuration can be deleted, edited, or enabled/disabled.
In this area, the creation of Queue(s), Counter(s) and User(s) is mandatory for the Queue Management system and correct service flow.
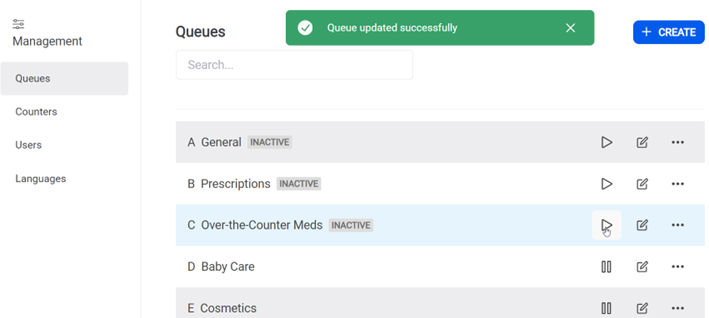
Queues
Queues represent the types of services you provide to visitors inside the location. They are used for queueing and appointments.
To open the Queues subpage, go to Management > Queues.
Queues are identified by a tag (ex. A, A1, B, 1) and a name. The tag will be associated with the ticket number when a ticket is generated, and the name is the main identifier of the service for the visitors.
Adding a Queue
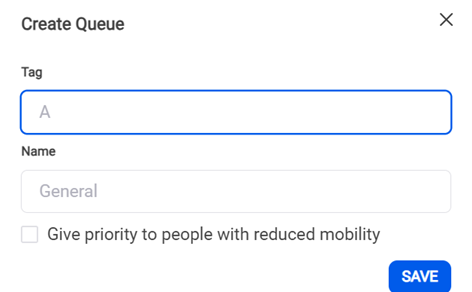
- Click on the “+ Create” button – a popup submenu will appear.
- Fill in the queues’ basic information: tag, service name and priority associated (yes/no).
- Save changes.
- Proceed to edit your queue for a more detailed dashboard.
Editing a Queue
To change a previously created service, click on its respective “Edit” button and update its configurations. For each action, you must save the configurations.
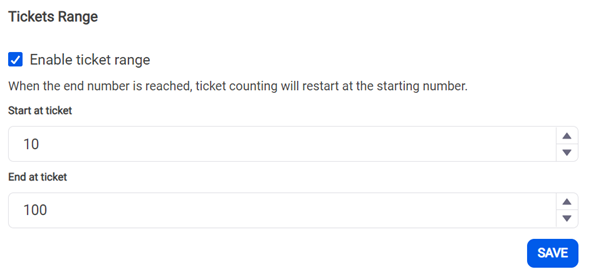
You can enable ticket range: you can set your queue to start and end at a ticket number defined by you. Once the end number is reached, ticket counting will restart at the starting number. If ticket range is enabled, tickets will start at 0 and finish when the system is set to reset.
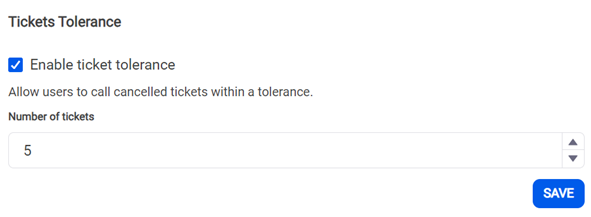
You can enable ticket tolerance, allowing users to call cancelled tickets within the tolerance defined by you. If ticket tolerance is enabled, no past tickets can be called.
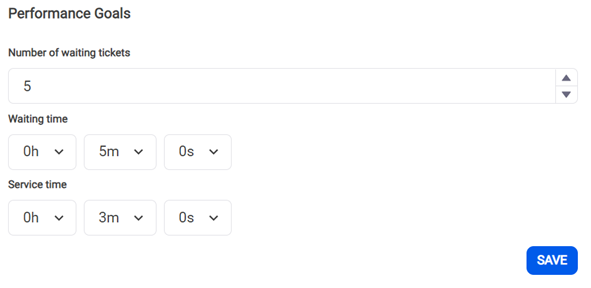
You can define your performance goals and set the maximum desired number of waiting tickets, the maximum desired amount of waiting time and maximum amount of service time for each queue. The metrics defined in this area will be a key factor for the metrics displayed on the Dashboard and History.
You can create ticket restrictions and set a maximum number of tickets available per day and at a defined schedule. There are no limits on the number of ticket restrictions that you can create. You can also pause, edit and delete these configurations, at any time.
If you pause, there will be no ticket restrictions until future reactivation. If you edit, you must save changes before leaving the submenu. If you delete it, the action is irreversible.
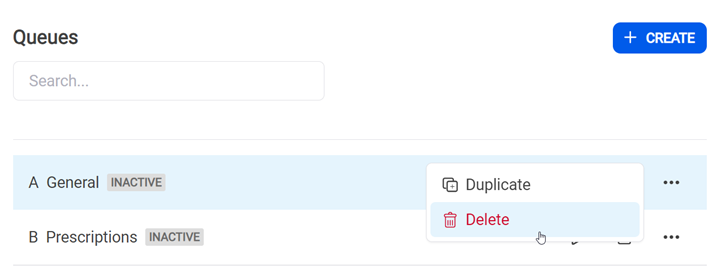
Deleting a Queue
You can delete a single queue by clicking on its ‘Delete’ button at the actions box or at the bottom of the its Edit page. To confirm the delete action, simply click on “Yes” when the confirmation popup appears.
If you delete a queue in use, it will be deleted from all resources where it was assigned (statistical data will be kept in the database).
If you delete a queue mapped with a service from the appointment’s integration and there is no default/fallback configured queue, once the visitor tries to check-in an error will occur.
This action is irreversible.

Counters
Counters are the workspaces where users handle the generated tickets. Each counter requires a logged-in user that calls tickets from the services available on that counter. Counters can have different assigned services and calling priorities.
Counters are identified by a tag and a name. Both can be used to identify the counter to where the visitor must go once called.

Adding a Counter
To add a new counter, follow these steps:
- Click on the
+ Createbutton – a popup submenu will appear. - Enter the counter’s tag and name, then save the changes.
⚠️ You can have multiple counters with the same tag.
Assigning Queues to a Counter
After creating a counter, you need to assign queues to it:
- Enable queues: A queue is assigned to the counter when its toggle switch is blue.
- Set priorities: By default, all queues have a "Normal" priority (yellow). However, you can change this to ensure certain queues are served first or last.
Setting Priorities Between Queues in the Same Counter
To assign priority levels to queues in a specific counter:
-
Locate the counter where you want to adjust queue priorities.
-
Find the "Associate Queues" section.
-
Select one of the five priority levels:
- Very High (🔴 Red)
- High (🟠 Orange)
- Normal (🟡 Yellow) (default)
- Low (🟢 Green)
- Very Low (🔵 Blue)
💾 Changes are saved automatically.
How Priority Levels Work
Queues are processed in priority order (highest to lowest) and by arrival time within each priority level. However, lower-priority queues may experience longer wait times.
Example Scenario
Consider a counter with three queues assigned different priorities:
- Queue A – Very High (🔴 1)
- Queue B – Normal (🟡 3)
- Queue C – Very Low (🔵 5)
If three tickets (one per queue) are generated simultaneously:
- Queue A (1) tickets are called first.
- Queue B (3) tickets may wait (3 - 1) = 2x longer than Queue A.
- Queue C (5) tickets may wait (5 - 1) = 4x longer than Queue A and (5 - 3) = 2x longer than Queue B.
This ensures that higher-priority tickets are served first while still allowing lower-priority tickets to be processed fairly.

Temporarily deactivating a counter
To disable a counter without deleting it click on the desired counter DISABLE/ENABLE button. The button symbol will change from ⏸️ to ▶️. A deactivated counter will not be able to call tickets in the QM-PAD.
Deleting a counter
You can delete a counter by clicking on its Delete button in the More Actions Option. Alternatively, you can select the counter by clicking on its Edit button, scroll down, and click on the Remove button. Once this action is confirmed, it is irreversible.
ℹ️ If you delete an assigned counter, that counter will disappear from all users.
Users
Users are the organization’s staff members who interact with Qube with predefined roles that determine their permissions within the system.
To access the Users area, go to Management > Users.
Roles & Permissions
Users can have one of the following three predefined roles:
1. Staff Member
Permissions:
- Queue Management Operations
- View Location Settings
- View Management Resources:
- Queues
- Counters
2. Service Manager
Permissions:
- Queue Management Operations
- View Location Settings
- Change only Queue Management (QM) Settings
- Add / Remove / Edit Management Resources:
- Queues (Edit Only)
- Counters (Edit Only)
- Users
- Languages
- Add / Remove / Edit Assets:
- Media
- Playlists
- Feeds
- Queues lists
- Voice calling
- Devices:
- Activate / Deactivate
- Refresh / Refresh All
- Reboot
- Add / Remove / Edit Layouts:
- Player Layouts
- Ticket Kiosk Layouts
- Metrics
3. Administrator (All the above, and)
Permissions:
- Add / Remove / Edit Management Resources:
- Queues
- Counters
- Device:
- Register / Unregister
- Integrations
Role Assignment
Roles are assigned to different users, and each user can have only one assigned role.
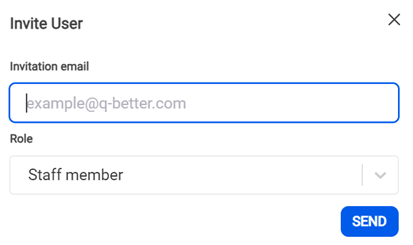
Adding a user
- Click on the “+ Invite” button – a popup submenu will appear.
- Fill all the required information: invitation email and role.
- Save changes.
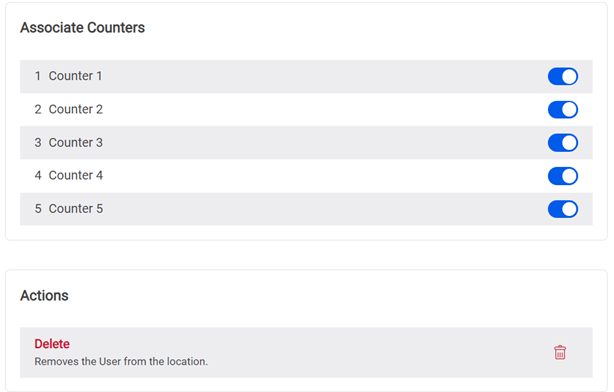
After creating a user, you need to assign one or more counters. Click on the respective
Editbutton and assign the user respective counter(s).
Editing a user
To change the counters associated with a previously created user, click on the respective Edit button and update its configurations.
A user’s role cannot be edited. For this, you must delete the user and send a new invite with the new respective role.
Deleting a user
You can delete a single user by clicking on its Delete button in the More Actions Option. Alternatively, you can select the user by clicking on its “Edit” button, scroll down, and click on the Remove button. Once this action is confirmed, it is irreversible.
ℹ️ You cannot delete your own profile.